
ここ最近ちょくちょくphp-webdriverを試していて、takeScreenshot();で画面キャプチャを撮った時に全画面のキャプチャが撮れないぃ!ムキーッ!!となっていたのですが、色々調べた結果何とかなったので書きます。
まず先にパク参考とさせて頂いた記事を紹介します。
- 私がSeleniumを使ってスクリーンショットを撮るまでに出会った闇の全て
- Seleniumで撮ったスクリーンショットがブラウザごとにばらばら問題 – Qiita
- Chromeでフルサイズのスクリーンショットを撮るためのパッチ – Qiita


記事を読んでみると、Seleniumを使ったスクリーンショットで撮れる範囲がブラウザによってバラバラであるということが分かります。※1
(以前書いた php-webdriverをWindowsのローカルで試す | Shimabox Blog の通りIEはページ全体を撮ってくれます)
そして、どれも一貫して
画面をスクロールさせつつキャプチャを撮ってその画像を繋ぎ合わせる
という対応策を講じていることが分かります。
PHPで同じことをやっているものはないかなぁと少し探したのですが、自分では見つからなかったので Chromeでフルサイズのスクリーンショットを撮るためのパッチ – Qiita の実装内容を参考に(ほぼ完コピ)してPHPで書いてみました。
ソース
GitHubにあげています。
shimabox/sample-phpwebdriver: Test with phpunit and phpwebdriver

必要な部分を抜粋するとこんな感じです。
SMB\PhpWebDriver\Modules\Screenshot.php
<?php

namespace SMB\PhpWebDriver\Modules;

use Facebook\WebDriver\Remote\RemoteWebDriver;
use Facebook\WebDriver\Remote\WebDriverBrowserType;

/**
 * Screenshot
 */
class Screenshot
{
    /**
     * スクロールバー非表示用 style
     * @var string
     */
    private static $hiddenScrollBarStyle = "document.getElementsByTagName('body')[0].style.overflow='hidden'";

    /**
     * 画面キャプチャ
     * @param RemoteWebDriver $driver
     * @param string $filename
     * @param int $sleep Sleep for seconds
     * @return string キャプチャ画像ファイルパス
     */
    public function take(RemoteWebDriver $driver, $filename, $sleep=1)
    {
        (int)$sleep <= 0 ?: sleep((int)$sleep); $driver->executeScript(self::$hiddenScrollBarStyle);
        $driver->takeScreenshot($filename);

        $this->throwExceptionIfNotExistsFile($filename, 'Could not save screenshot');

        return $filename;
    }

    /**
     * 全画面キャプチャ
     * @param RemoteWebDriver $driver
     * @param string $filepath
     * @param string $filename
     * @param string $browser
     * @param int $sleep Sleep for seconds
     * @return string キャプチャ画像ファイルパス
     */
    public function takeFull(RemoteWebDriver $driver, $filepath, $filename, $browser, $sleep=1)
    {
        (int)$sleep <= 0 ?: sleep((int)$sleep); $captureFile = rtrim($filepath, '/') . '/' . $filename; if ($browser === WebDriverBrowserType::IE) { // IE(internet explorer)はページ全体を撮ってくれる return $this->take($driver, $captureFile, 0);
        }

        // スクロールバー非表示
        $driver->executeScript(self::$hiddenScrollBarStyle);

        // ページの左上までスクロール
        $driver->executeScript("window.scrollTo(0, 0);");

        // 実際のコンテンツサイズを取得
        $contentsWidth = $driver->executeScript("return Math.max(document.body.scrollWidth, document.body.offsetWidth, document.documentElement.clientWidth, document.documentElement.scrollWidth, document.documentElement.offsetWidth);");
        $contentsHeight = $driver->executeScript("return Math.max(document.body.scrollHeight, document.body.offsetHeight, document.documentElement.clientHeight, document.documentElement.scrollHeight, document.documentElement.offsetHeight);");

        // 現在表示されている画面のサイズを取得
        $viewWidth = $driver->executeScript("return window.innerWidth;");
        $viewHeight = $driver->executeScript("return window.innerHeight;");

        // 画像枠 この枠に対して切り取った画像を継ぎ接ぎしていく
        $imgFrame = imagecreatetruecolor($contentsWidth, $contentsHeight);

        // Macだと画像を継ぎ足した部分の隅(右下)が若干粗くなる(黒ずむ)ので透過にして少しごまかす
        imagealphablending($imgFrame, false);
        imagesavealpha($imgFrame, true);

        // スクロール操作用
        $scrollWidth = 0;
        $scrollHeight = 0;

        // 縦分割数
        $rowCount = 0;

        // 縦スクロールの処理
        // コンテンツの縦幅を超えるまで現在見えている画面の縦幅サイズずつスクロールさせる
        while ($scrollHeight < $contentsHeight) { // 横分割数 $colCount = 0; // 横スクロール初期化 $scrollWidth = 0; // 画面位置の設定 $driver->executeScript(sprintf("window.scrollTo(%d, %d);", $scrollWidth, $scrollHeight));

            // 横スクロールの処理
            // コンテンツの横幅を超えるまで現在見えている画面の横幅サイズずつスクロールさせる
            while ($scrollWidth < $contentsWidth) { if ($colCount > 0) {
                    // 画面サイズ分横スクロール
                    $driver->executeScript("window.scrollBy(". (string)$viewWidth . ", 0);");
                }

                // 現在表示されている範囲のキャプチャをとる
                $tmpFile = $filepath . sprintf($browser . '_tmp_%d_%d_', $rowCount, $colCount) . '_' . time() . '.png';
                $driver->takeScreenshot($tmpFile);

                $this->throwExceptionIfNotExistsFile($tmpFile, 'Could not save tmp screenshot');

                // 貼り付け元画像を作成
                $src = imagecreatefrompng($tmpFile);

                // スクロール済の画面幅 + 現在表示中の幅 がコンテンツの右端(幅)に到達したか
                $reachedContentsWidth = $this->toReachContentsWidth(($scrollWidth + $viewWidth), $contentsWidth);
                // スクロール済の画面高さ + 現在表示中の高さ がコンテンツの下端(高さ)に到達したか
                $reachedContentsHeight = $this->toReachContentsHeight(($scrollHeight + $viewHeight), $contentsHeight);

                // スクロール量がコンテンツの右端か下端に到達したら画像を切り取ってimgFrameに貼り付ける
                if ($reachedContentsWidth || $reachedContentsHeight) {

                    $newWidth = $viewWidth;
                    $newHeight = $viewHeight;

                    $srcX = 0;
                    $srcY = 0;

                    // スクロール済の画面幅 + 現在表示中の幅 がコンテンツの幅に到達
                    if ($reachedContentsWidth) {
                        // キャプチャに足りない部分の横幅を求める
                        $newWidth = $contentsWidth - $scrollWidth;
                        // 現在表示されている範囲のキャプチャから切り取る範囲のx座標を求める
                        $srcX = $viewWidth - $newWidth;
                    }

                    // スクロール済の画面高さ + 現在表示中の高さ がコンテンツの高さに到達
                    if ($reachedContentsHeight) {
                        // キャプチャに足りない部分の縦幅を求める
                        $newHeight = $contentsHeight - $scrollHeight;
                        // 現在表示されている範囲のキャプチャから切り取る範囲のy座標を求める
                        $srcY = $viewHeight - $newHeight;
                        // 高さが超えている間は横にスクロールさせる
                        $colCount += 1;
                    }

                    // 現在表示されている範囲のキャプチャから指定した範囲で切り取った画像を
                    // imgFrameに貼り付ける
                    $this->toPatchTheImage($tmpFile, $captureFile, $imgFrame, $src, $scrollWidth, $scrollHeight, $srcX, $srcY, $newWidth, $newHeight);

                    $scrollWidth += $newWidth;

                    continue;
                }

                // 右端か下端に到達していない限り現在表示されている範囲のキャプチャは
                // そのままimgFrameに貼り付ける
                $this->toPatchTheImage($tmpFile, $captureFile, $imgFrame, $src, $scrollWidth, $scrollHeight, 0, 0, $viewWidth, $viewHeight);

                $scrollWidth += $viewWidth;
                $colCount += 1;
            }

            $scrollHeight += $viewHeight;
            $rowCount += 1;
        }

        $this->throwExceptionIfNotExistsFile($captureFile, 'Could not save full screenshot');

        return $captureFile;
    }

    /**
     * スクロール済の画面幅 + 現在表示中の幅 がコンテンツの右端(幅)に到達したか
     * @param int $targetWidth   スクロール済の画面幅 + 現在表示中の画面幅
     * @param int $contentsWidth コンテンツの幅
     * @return boolean
     */
    private function toReachContentsWidth($targetWidth, $contentsWidth)
    {
        return $targetWidth >= $contentsWidth;
    }

    /**
     * スクロール済の画面高さ + 現在表示中の高さ がコンテンツの下端(高さ)に到達したか
     * @param int $targetHeight   スクロール済の画面高さ + 現在表示中の画面高さ
     * @param int $contentsHeight コンテンツの高さ
     * @return boolean
     */
    private function toReachContentsHeight($targetHeight, $contentsHeight)
    {
        return $targetHeight >= $contentsHeight;
    }

    /**
     * 画像の継ぎ接ぎをする
     * @param string    $tmpFile     現在表示されている範囲のキャプチャ画像
     * @param string    $captureFile キャプチャ画像パス
     * @param resource  $dest        貼り付け先画像
     * @param resource  $src         貼り付け元画像
     * @param int       $destX       貼り付け先画像のx座標
     * @param int       $destY       貼り付け先画像のy座標
     * @param int       $srcX        貼り付け元画像のx座標
     * @param int       $srcY        貼り付け元画像のy座標
     * @param int       $srcW        貼り付け元画像の幅
     * @param int       $srcH        貼り付け元画像の高さ
     */
    private function toPatchTheImage($tmpFile, $captureFile, $dest, $src, $destX, $destY, $srcX, $srcY, $srcW, $srcH)
    {
        // copy
        imagecopy($dest, $src, $destX, $destY, $srcX, $srcY, $srcW, $srcH);

        // save
        imagepng($dest, $captureFile);

        @unlink($tmpFile); // unlink function might be restricted in mac os x.
    }

    /**
     * 画像ファイルが存在しない場合、例外を投げる
     *
     * @param string $file
     * @param string $message
     * @throws \Exception
     */
    private function throwExceptionIfNotExistsFile($file, $message)
    {
        if( ! file_exists($file)) {
            throw new \Exception($message);
        }
    }
}
まず、こんなクラスを用意しました。
こいつのtakeFull();が全画面キャプチャ処理を行います。
※take();は、takeScreenshot()のラッパーです
そして以下がこのクラスを使うサンプル用ソースになります。
sample_5_fullscreenshot.php
<?php

require_once realpath(__DIR__ . '/../vendor') . '/autoload.php';

use Facebook\WebDriver\Remote\RemoteWebDriver;
use Facebook\WebDriver\Remote\WebDriverBrowserType;
use Facebook\WebDriver\Remote\DesiredCapabilities;
use Facebook\WebDriver\WebDriverExpectedCondition;
use Facebook\WebDriver\WebDriverBy;
use Facebook\WebDriver\WebDriverDimension;
use Facebook\WebDriver\Chrome;
use Facebook\WebDriver\Firefox;

use SMB\PhpWebDriver\Modules\Screenshot;

/**
 * selenium php-webdriver 全画面キャプチャのサンプル
 * @param string $browser chrome or firefox or ie
 * @param array $size ['w' => xxx, 'h' => xxx]
 * @param string overrideUA true : override Useragent
 */
function sample_5($browser, array $size=[], $overrideUA = '')
{
    // selenium
    $host = 'http://localhost:4444/wd/hub';

    switch ($browser) {
        case WebDriverBrowserType::CHROME :
            $cap = DesiredCapabilities::chrome();

            if ($overrideUA !== '') {
                $options = new Chrome\ChromeOptions();
                $options->addArguments(['--user-agent=' . $overrideUA]);

                $cap->setCapability(Chrome\ChromeOptions::CAPABILITY, $options);
            }

            if (getenv('CHROME_DRIVER_PATH') !== '') {
                putenv('webdriver.chrome.driver=' . getenv('CHROME_DRIVER_PATH'));
            }

            $driver = RemoteWebDriver::create($host, $cap);

            break;
        case WebDriverBrowserType::FIREFOX :
            $cap = DesiredCapabilities::firefox();

            if ($overrideUA !== '') {
                $profile = new Firefox\FirefoxProfile();
                $profile->setPreference('general.useragent.override', $overrideUA);

                $cap->setCapability(Firefox\FirefoxDriver::PROFILE, $profile);
            }

            if (getenv('FIREFOX_DRIVER_PATH') !== '') {
                putenv('webdriver.gecko.driver=' . getenv('FIREFOX_DRIVER_PATH'));
            }

            $driver = RemoteWebDriver::create($host, $cap);

            break;
        case WebDriverBrowserType::IE :
            if (getenv('IE_DRIVER_PATH') !== '') {
                putenv('webdriver.ie.driver=' . getenv('IE_DRIVER_PATH'));
            }
            $driver = RemoteWebDriver::create($host, DesiredCapabilities::internetExplorer());
            break;
    }

    // 画面サイズをMAXにする場合
    // $driver->manage()->window()->maximize();

    // 画面サイズの指定あり
    if (isset($size['w']) && isset($size['h'])) {
        $dimension = new WebDriverDimension($size['w'], $size['h']);
        $driver->manage()->window()->setSize($dimension);
    }

    // 指定URLへ遷移 (Google)
    $driver->get('https://www.google.co.jp/');

    // 検索Box
    $element = $driver->findElement(WebDriverBy::name('q'));
    // 検索Boxにキーワードを入力して
    $element->sendKeys('夏休みの予定');
    // 検索実行
    $element->submit();

    // 検索結果画面のタイトルが '夏休みの予定 - Google 検索' になるまで10秒間待機する
    // 指定したタイトルにならずに10秒以上経ったら
    // 'Facebook\WebDriver\Exception\TimeOutException' がthrowされる
    $driver->wait(10)->until(
        WebDriverExpectedCondition::titleIs('夏休みの予定 - Google 検索')
    );

    // GWの予定 - Google 検索 というタイトルが取得できることを確認する
    if ($driver->getTitle() !== '夏休みの予定 - Google 検索') {
        throw new Exception('fail');
    }

    // キャプチャ
    $fileName = $overrideUA === '' ? __METHOD__ . "_{$browser}.png" : __METHOD__ . "_override_ua_{$browser}.png";
    $captureDirectoryPath = realpath(__DIR__ . '/../capture') . '/';

    $screenshot = new Screenshot();
    $screenshot->takeFull($driver, $captureDirectoryPath, $fileName, $browser);

    // ブラウザを閉じる
    $driver->close();
}

// iPhone6のサイズ
$size4iPhone6 = ['w' => 375, 'h' => 667];

// iOS10のUA
$ua4iOS = 'Mozilla/5.0 (iPhone; CPU iPhone OS 10_0_1 like Mac OS X) AppleWebKit/602.1.50 (KHTML, like Gecko) Version/10.0 Mobile/14A403 Safari/602.1';

/**
 |------------------------------------------------------------------------------
 | 有効にしたいドライバーの値を true にしてください
 |------------------------------------------------------------------------------
 */

// chrome
if (getenv('ENABLED_CHROME_DRIVER') === 'true') {
    sample_5(WebDriverBrowserType::CHROME);
    sample_5(WebDriverBrowserType::CHROME, $size4iPhone6, $ua4iOS);
}

// firefox
if (getenv('ENABLED_FIREFOX_DRIVER') === 'true') {
    sample_5(WebDriverBrowserType::FIREFOX);
    sample_5(WebDriverBrowserType::FIREFOX, $size4iPhone6, $ua4iOS);
}

// ie
if (getenv('ENABLED_IE_DRIVER') === 'true') {
    sample_5(WebDriverBrowserType::IE);
}
takeScreenshot(); でとったキャプチャ
まずはtakeScreenshot();で撮ったキャプチャです。
※ ブラウザはchrome
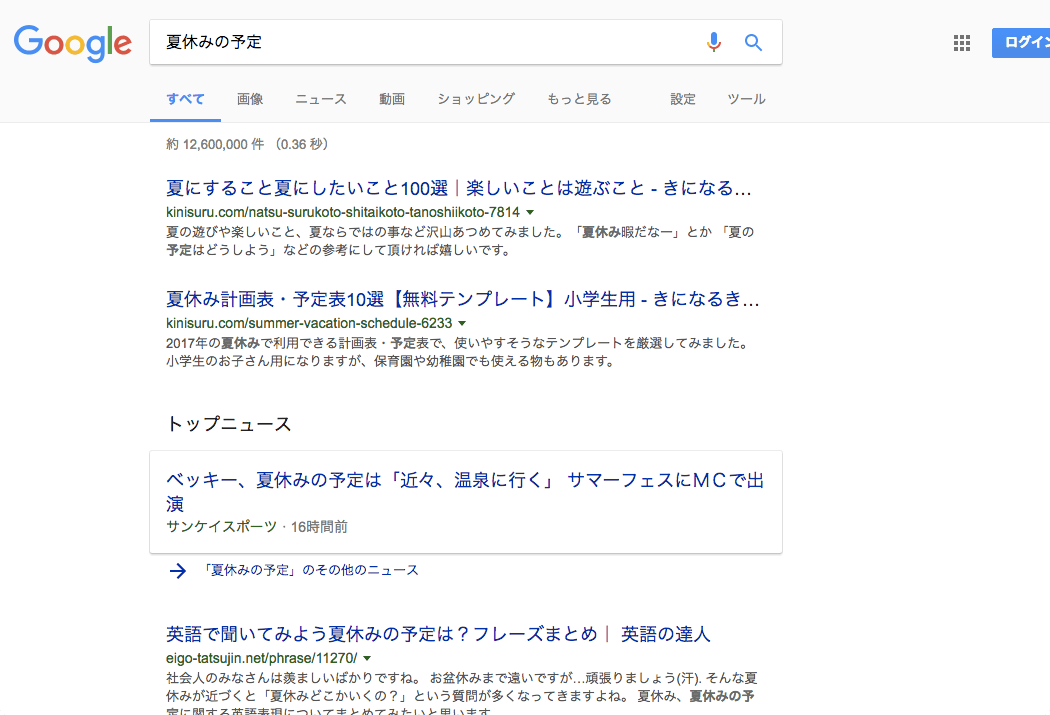
ご覧の通り、あともう一息でございます。
Screenshot::takeFull() で撮ったキャプチャ
続いてScreenshot::takeFull()で撮ったキャプチャです。
※ ブラウザはchrome

うん。全部撮れています。
もう少し詳しく
スクロールさせている処理は見れば大体わかると思いますので、スクロールさせていった時にコンテンツの幅を超えた場合の処理を少し詳しく見てみたいと思います。
1. 例えば、こういったコンテンツのキャプチャを撮りたいとします。
(このコンテンツは 600px × 400px のサイズだとします)
2. 最初に、600px x 400px の画像を作成します。
// 画像枠 この枠に対して切り取った画像を継ぎ接ぎしていく
$imgFrame = imagecreatetruecolor($contentsWidth, $contentsHeight);
こんな画像を作ります。
3. そしてこのコンテンツを、350px x 400px のサイズでスクロールさせながらキャプチャを撮っていき上記2.で作った画像に継ぎ足していきます。
※ 横幅600pxなので2回スクロールされます
4. 1スクロール目のキャプチャはこうなります
5. キャプチャ範囲は、コンテンツの幅も縦も超えていないのでそのまま 2.の画像に継ぎ足します。
// 右端か下端に到達していない限り現在表示されている範囲のキャプチャは
// そのままimgFrameに貼り付ける
$this->toPatchTheImage($tmpFile, $captureFile, $imgFrame, $src, $scrollWidth, $scrollHeight, 0, 0, $viewWidth, $viewHeight);
こんな画像になります。

6. 2スクロール目
こちらを見ると分かるように、横スクロールをしていって最後にコンテンツの幅を超える部分のキャプチャは、最後のひとつ前に撮ったキャプチャと被る部分が出てきてしまいます。
つまり、キャプチャに足りていない部分のみ抽出して 2.の画像に継ぎ足さないといけません。
このあたりを適当にやって 2.の画像に継ぎ足してしまうと以下のような画像になったりします。
そして、継ぎ足す画像範囲の計算をしているのが以下の部分になります。
// スクロール済の画面幅 + 現在表示中の幅 がコンテンツの右端(幅)に到達したか
$reachedContentsWidth = $this->toReachContentsWidth(($scrollWidth + $viewWidth), $contentsWidth);

// 〜

// スクロール済の画面幅 + 現在表示中の幅 がコンテンツの幅に到達
if ($reachedContentsWidth) {
    // キャプチャに足りない部分の横幅を求める
    $newWidth = $contentsWidth - $scrollWidth;
    // 現在表示されている範囲のキャプチャから切り取る範囲のx座標を求める
    $srcX = $viewWidth - $newWidth;
}
上記例で当てはめると、
$reachedContentsWidth(true) = ($scrollWidth(350) + $viewWidth(350)) >= $contentsWidth(600);

// キャプチャに足りない部分の横幅を求める
$newWidth(250) = $contentsWidth(600) - $scrollWidth(350);
// => 250px 足りないという事が分かる

// 現在表示されている範囲のキャプチャから切り取る範囲のx座標を求める
$srcX(100) = $viewWidth(350) - $newWidth(250);
// => 切り取る範囲のx座標は100だという事が分かる
となることが分かりますので、2スクロール目の画像から x座標を100(y座標を0), 横幅を250px(縦幅400px) の範囲のみ抽出し 2.の画像に継ぎ足します。
そうすると見事に継ぎ足された画像になるはずです。

上記は、縦がはみ出た場合も一緒です。
縦長(スマホ)の場合は以下の動きになります。
※ ちょっとずつ下にスクロールしています
※ 雑なgifですいません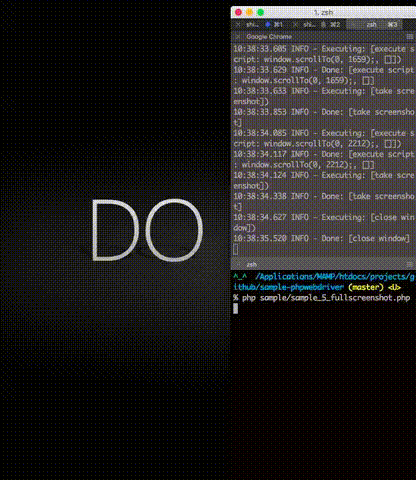
スクロール中の処理は大体こんな感じです。
なんで透過pngがベースなんだぜ?
以下の通り、貼り付け先のベースとなる画像を透過にしています。
// 画像枠 この枠に対して切り取った画像を継ぎ接ぎしていく
$imgFrame = imagecreatetruecolor($contentsWidth, $contentsHeight);

// Macだと画像を継ぎ足した部分の隅(右下)が若干粗くなる(黒ずむ)ので透過にして少しごまかす
imagealphablending($imgFrame, false);
imagesavealpha($imgFrame, true);
それはコメントにある通りMacだと継ぎ足し部分の隅が若干粗くなってしまうので、なるべく目立たないようにしているだけです。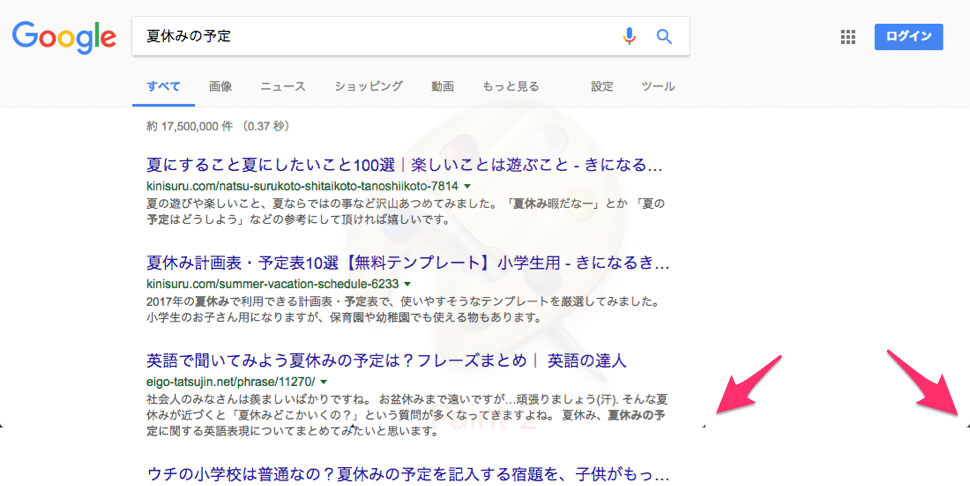
※ Macだとこんな感じになる
Why 何故なんだぜ?
SeleniumとWebDriverの最新事情
※1 SeleniumとWebDriverの最新事情~標準化が進み、さらに強力なテストツールへ! その影でSelenium IDEは…… (3/3):CodeZine(コードジン)
- スクリーンショットの取得範囲はフレームバッファの内容、つまり画面上に見えている範囲という仕様に一律に規定(2017年7月現在)
- これにより、ページ全体のスクリーンショットを取れるブラウザは規格外
となるようです。
今回のこの実装がいつまで通用するか分かりませんが、今のところ上記の方法であればフルスクリーンショットは撮れます。
まとめ
画面のフルスクリーンショットが撮れるようになりました。
ただし、さすがにちょっと時間がかかるのでどうしても必要な時にだけ使ったら良いような気がします。
なお、全画面のキャプチャとかフルスクリーンショットとか言葉が揺れまくっていますがどちらも同じ意味です。
おまけ
継ぎ足し部分に色を付けてみる
継ぎ足し部分に色を付けるとこんな感じになります。
※ http://www.milliondollarhomepage.com/ で試してみました
// 現在表示されている範囲のキャプチャから指定した範囲で切り取った画像を
// imgFrameに貼り付ける
imagefilter($src, IMG_FILTER_COLORIZE, 0, 255, 0); // これを追加
$this->toPatchTheImage($tmpFile, $captureFile, $imgFrame, $src, $scrollWidth, $scrollHeight, $srcX, $srcY, $newWidth, $newHeight);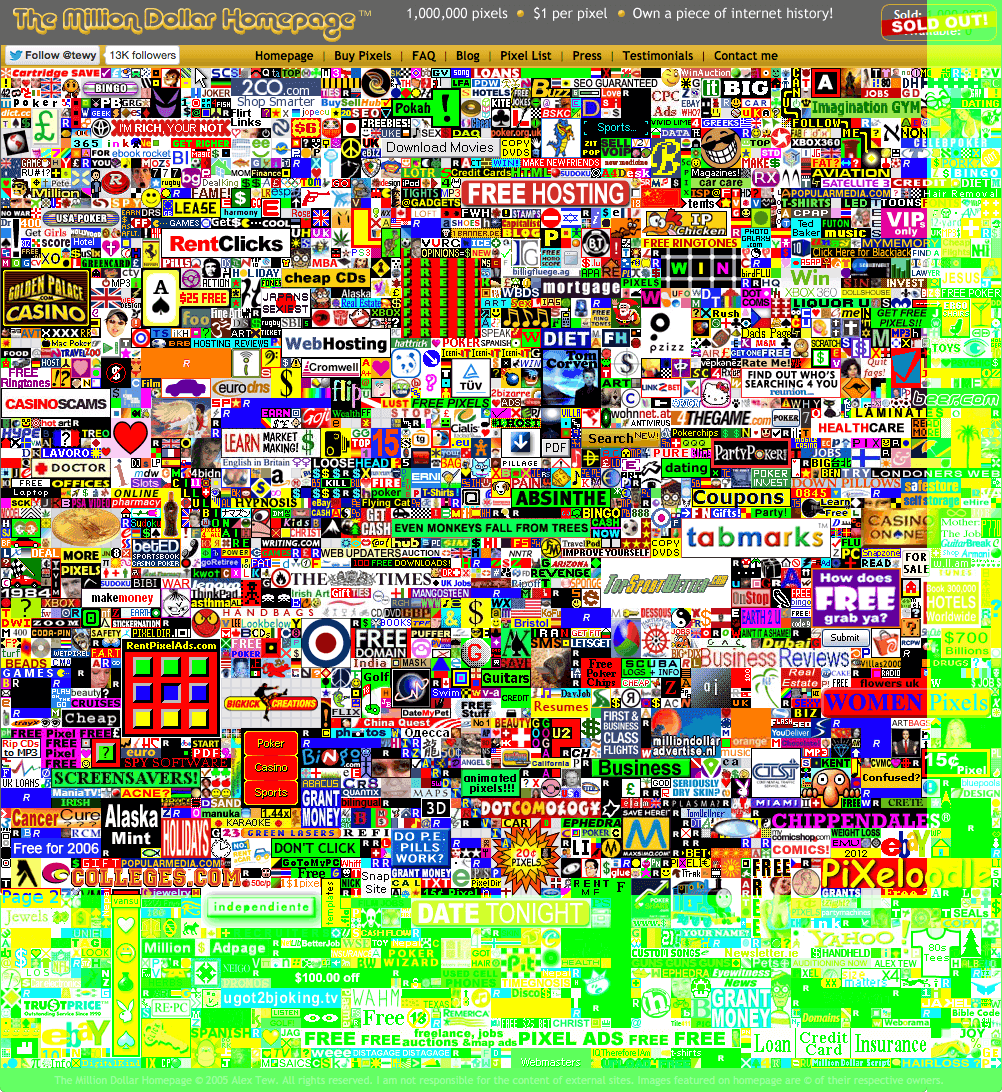
※ 薄い黄緑で塗られている箇所が継ぎ足した部分になります
上記内容で動作しないケースがあったら
こちらの記事を参考にして頂けると解決するかもしれません。
php-webdriverのラッパーライブラリ”screru”のバージョンをあげた – Shimabox Blog
